INDICATIONS
- All babies <1000 g
- Babies –1000 g ventilated or unwell (e.g. HIE) (a double lumen catheter may be indicated if baby requires significant support)
- Exchange transfusion
- Administration of hypertonic solutions (e.g. glucose >12.5%, parenteral nutrition or inotropes)
CONTRAINDICATIONS
- Umbilical sepsis
- Necrotising enterocolitis (NEC)
- Gastroschisis/exomphalos
EQUIPMENT
- Umbilical vein catheterisation pack
- suture (if not included in above pack)
- Umbilical venous catheter (UVC)
- 3-way tap
- Gown and gloves
- Sterile drape
- Infusion pump
- Sodium chloride 0.9% infusion
- Umbilical tape
- Cleaning solution as per unit policy
- Zinc oxide tape or Elastoplast®
PROCEDURE
- Wherever possible inform parents of need and associated risks before procedure; if an emergency, delay explanation until after insertion
- Risks include sepsis and thrombosis
- See Consent guideline
Pre-sterile preparation
- Monitor all vital signs during procedure
- Estimate length of catheter to be inserted: use distance between xiphisternum and umbilicus +1
- Remember to add length of cord stump to give final distance catheter needs to be advanced
- Tie umbilical tape loosely around base of cord
Sterile preparation
- Scrub up, and put on gown and gloves
- Use sterile technique
- Clean cord stump and surrounding skin with cleaning solution
- Attach 3-way tap to catheter and flush all parts with sodium chloride 0.9%. Leave syringe attached
- Place all equipment to be used on sterile towel covering sterile trolley
- Drape umbilical stump with sterile towels
- Place sterile sheet with a hole in the centre over the cord. Pull the cord through the hole
Insertion of umbilical catheter
-
Clamp across cord with artery forceps
-
Apply gentle upward traction
-
Cut along underside of forceps with scalpel blade cleanly to leave 2–3 cm stump or, if also placing an umbilical arterial catheter (UAC) and you have been trained in this procedure, consider using side-on technique (see Umbilical artery catheter: insertion and removal guideline)
- Identify vessels (see Figure 1):
- single thin-walled vein
- 2 small thick-walled arteries that can protrude from cut surface
- Support cord with artery forceps placed near to vein
- Locate lumen of vein using either a dilator or fine forceps
- Insert catheter (3.5 F for babies with birth weight <1500 g and 5 F for those ≥1500 g) with 3-way tap closed to catheter
- Resistance often indicates malposition; withdraw catheter until it freely aspirates blood
- Advance catheter to desired distance, and open 3-way tap to check for easy withdrawal of blood
Securing catheter
- If a UAC is also to be inserted, site both catheters before securing either. Secure each catheter separately as below to allow independent removal
Figure 1: Identifying umbilical cord vessels
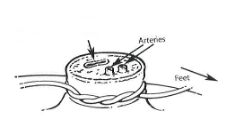
Figure 2: Effective system for more permanent fixation of umbilical catheters
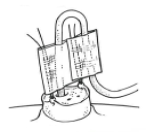
- For each catheter place 2 sutures into cord, 1 on either side of the catheter, allowing suture ends to be ≥5 cm long beyond cut surface of cord. Bend the catheter in a loop then sandwich it and ends of the 2 sutures between zinc oxide or Elastoplast® tape, as close to the cord as possible without touching cord (like a flag) (see Figure 2). The sutures should be separate from the catheter on either side as this allows easy adjustment of catheter length, should this be necessary. Top edge of sutures can be tied together above flag for extra security after confirming X-ray position
- alternatively, suture can be criss-crossed along shaft of catheter and secured
- If catheter requires adjustment, cut zinc oxide or Elastoplast® tape between catheter and 2 suture ends, pull back catheter to desired length and retape; never advance once tape has been applied as it is not sterile
- Connect catheter to infusion
- Confirm position of catheter in IVC by combined chest and abdominal X-ray (UVC that has passed into the IVC should travel vertically from the umbilicus)
- optimal catheter placement: tip at T8-T9 but not in heart or liver shadow (usually at the level of or just below diaphragm)
- if tip at T10 or below:
- check catheter still sampling
- discuss with consultant
- use short-term only (consultant decision to use at risk)
- replace at earliest opportunity
- If catheter length adjusted, repeat X-ray
- X-ray after line insertion, routinely combined chest and abdominal
- subsequent X-rays following line adjustment may be combined or dedicated chest/ abdominal, depending on initial and new estimated line positioning
DOCUMENTATION
-
Record in notes details of procedure, including indication, description of catheter, number of attempts, length inserted, catheter position on X-ray and whether any adjustments were made
-
Position to be verified in writing by consultant neonatologist/paediatrician/radiologist report
-
Always label umbilical arterial and venous catheters, using the appropriately coloured and labelled stickers
-
Place traceability sticker from catheter/insertion pack into notes
AFTERCARE
- Review need for catheter daily (if catheter tip at or below T10, replace with long line at earliest opportunity)
- Monitor circulation in lower limbs and buttocks whilst catheter in situ
- Leave cord stump exposed to air
- Catheter may remain in place for up to 7–10 days. If needed for >7 days consider insertion of long line due to increased risk of infection
- Any infusions must be connected to UVC using aseptic technique
- Catheters below T10 have increased risk of extravasation; can be used in the short-term but replace at earliest opportunity (consultant decision to use at risk)
COMPLICATIONS
- Air embolism
- Bleeding resulting from accidental disconnection
- Refractory hypoglycaemia due to malpositioning of catheter
- Infection: prophylactic antibiotics not required
- Thrombus formation
- Cardiac tamponade (see below)
- Any deterioration in a baby in whom a central venous catheter is present should raise the question of catheter related complications; particularly infection, extravasation, PN ascites and tamponade
- PN ascites may require urgent abdominal paracentesis
Cardiac tamponade
- Suspect in presence of:
- tachycardia
- poor perfusion
- soft heart sounds
- increasing cardiomegaly
- decreasing oxygen saturation
- arrhythmias
- Confirm diagnosis by:
- chest X-ray – widened mediastinum and enlarged cardiac shadow
- echocardiogram (if available)
- If there is cardiovascular compromise, consider drainage (see Pericardiocentesis guideline)
REMOVAL
REMOVAL - INDICATIONS
- Central venous access no longer required
- Concerns regarding sepsis
- Remove after a maximum of 10 days
REMOVAL - EQUIPMENT
- Sterile stitch cutter
- Sterile blade
- Cleaning solution as per unit policy
- Gown and gloves
REMOVAL - PROCEDURE
- Wash hands and put on gown and gloves
- Clean cord stump with cleaning solution
- Turn infusion pump off and clamp infusion line
- Ensure umbilical tape secured loosely around base of umbilicus
- Take utmost care when cutting the sutures so as not to cut through the UVC
- Withdraw catheter slowly
- If any bleeding noted, tighten umbilical tape
- Confirm catheter intact
- If unit policy, send catheter tip to microbiology
AFTERCARE
-
Nurse baby supine for 4 hr following removal and observe for bleeding
COMPLICATIONS
- Bleeding
- Loss of UVC tip
- Infection