INDICATIONS
- Frequent blood gas analysis:
- ventilated babies (most babies treated with CPAP can be managed with capillary gases)
- Continuous monitoring of arterial blood pressure (if poor circulation or need for accurate BP)
- Exchange transfusion
CONTRAINDICATIONS
-
Umbilical sepsis
-
Necrotising enterocolitis (NEC)
-
Evidence of vascular compromise in legs or buttocks
-
Congenital abnormality of the umbilicus (e.g. exomphalos or gastroschisis)
EQUIPMENT
- Umbilical artery catheterisation pack
- Umbilical catheter: <2 kg use size 3.5 FG, ≥2 kg use size up to 5 FG
- 3-way tap
- Sterile gown, gloves and drape
- Infusion pump
- Sodium chloride 0.9% or 0.45% infusion containing heparin 1 unit/mL
- Umbilical tape
- Cleaning solution as per unit policy
- Zinc oxide tape or Elastoplast®
PROCEDURE
Consent
- Wherever possible inform parents of need and associated risks before procedure; if an emergency, delay explanation until after insertion
- Risks include sepsis and thrombosis
- See Consent guideline
Pre-sterile Preparation
-
Monitor baby’s vital signs during procedure
-
Estimate length of catheter to be inserted using formula: (weight in kg x 3) + 9 cm
-
alternative method for umbilical artery catheter (UAC) length is twice distance from umbilicus to mid-inguinal point, plus distance from umbilicus to xiphisternum
-
add length of cord stump to give final length
-
prefer high catheter position i.e. tip above diaphragm (T6–T10 vertebral bodies)
-
-
Inspect lower limbs and buttocks for discolouration
-
Tie an umbilical tape loosely around base of cord
Sterile preparation
- Scrub up, put on gown and gloves using aseptic technique
- Ask assistant (if available) to gently hold baby’s legs and arms away from umbilical site
- Clean cord stump and surrounding skin with cleaning solution
- Attach 3-way tap to catheter and flush all parts with sodium chloride 0.9% leaving syringe attached
- Place all equipment to be used on a sterile towel covering a sterile trolley
- Place sterile drape with a hole in the centre over the umbilical stump. Pull the stump through the hole ready for catheter insertion
Insertion of arterial catheter
- Clamp across cord with artery forceps
- Apply gentle upward traction
- Cut along underside of forceps with a scalpel blade to reveal either the cut surface of the whole cord, or use a side-on approach cut part way through the artery at a 45° angle
- Leave a 2–3 cm stump; remember to measure length of cord stump and add to calculated placement to give final advancement distance
- Identify vessels, single thin-walled vein and 2 small thick-walled arteries that can protrude from the cut surface (see Figure 1)
- Support cord with artery forceps placed near to chosen artery
- Dilate lumen using either dilator or fine forceps
- Insert catheter with 3-way tap closed to catheter. If resistance felt, apply gentle steady pressure for 30–60 sec
- Advance catheter to the calculated distance
- Open 3-way tap to check for easy withdrawal of blood and for pulsation of blood in the catheter
Remove catheter and seek advice from a more experienced person
Figure 1: Identifying umblilical cord vessels
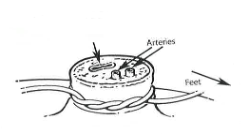
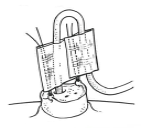
Figure 2: Effective system for more permanent fixation of umbilical catheters
Securing catheter
- If umbilical venous catheter (UVC) is also to be inserted, site both catheters before securing either. Secure each catheter separately to allow independent removal
- For each catheter place 2 sutures into cord, 1 on either side of catheter, allowing suture ends to be ≥5 cm long beyond cut surface of the cord. Sandwich catheter and ends of the 2 sutures between zinc oxide or Elastoplast®, tape as close to cord as possible without touching cord (like a flag) (see Figure 2). The sutures should be separate from the catheter on either side to allow easy adjustment of catheter length, should this be necessary. Top edge of sutures can be tied together above flag for extra security after confirming X-ray position
- alternatively, suture can be criss-crossed along shaft of catheter and secured
- If catheter requires adjustment, cut zinc oxide or Elastoplast® tape between catheter and the 2 suture ends, pull back catheter to desired length and retape; never advance once tape applied as this is not sterile
- Connect catheter to infusion of heparinised sodium chloride 0.9% or 0.45% at 0.5 mL/hr
- Confirm position of catheter by X-ray: unlike a UVC, a UAC will go down before it goes up
- a high position tip (above diaphragm but below T6) is preferred
- X-ray after line insertion routinely combined chest and abdominal
- subsequent X-rays following line adjustment may be combined or dedicated chest/ abdominal, depending on initial and new estimated line positioning
- if catheter below the diaphragm resite at L3–L4 (low position)
- if catheter position too high (above T6), withdraw to appropriate length
- if catheter length adjusted, repeat X-ray
Acceptable UAC tip positions
|
Tip position |
Acceptable or unacceptable |
Precautions/adjustments |
|
T6–T10 |
Acceptable |
Ideal high UAC position |
|
L3–L4 |
Acceptable |
Low UAC position |
|
T11 |
Can be used with caution |
Monitor blood sugar |
|
L5 |
Can be used with caution |
Monitor leg perfusion |
|
T12–L2 |
Not acceptable |
Risk of bowel or renal ischemia, pull back to L3–L4 |
|
Above T6 |
Not acceptable |
Pull back to T6–T10 |
|
Femoral artery |
Not acceptable |
Risk of leg ischemia, replace with new UAC |
Never attempt to advance a catheter after it has been secured;
either withdraw it to the low position or remove it and insert a new one
DOCUMENTATION
-
Record details of procedure in baby’s notes, including catheter position on X-ray and whether any adjustments were made
-
Always label umbilical arterial and venous catheters using the appropriately coloured and labelled stickers
-
Place traceability sticker from catheter/insertion pack into notes
AFTERCARE
- Nurse baby in a position where UAC can be observed
- Monitor circulation in lower limbs and buttocks while catheter is in situ
- Leave cord stump exposed to air
- Infuse heparinised sodium chloride 0.9% or 0.45% 0.5 mL/hr (1 unit heparin/mL)
- Do not infuse any other solution through UAC. Glucose or blood may be administered through UAC only in exceptional situations, on the authority of a consultant
COMPLICATIONS
- Bleeding following accidental disconnection
- Vasospasm: if blanching of the lower limb occurs and does not resolve, remove catheter (see Vascular spasm and thrombosis guideline)
- Embolisation from blood clot or air in the infusion system
- Thrombosis involving:
- femoral artery, resulting in limb ischaemia
- renal artery, resulting in haematuria, renal failure and hypertension
- mesenteric artery, resulting in NEC (see Vascular spasm and thrombosis guideline)
- Infection: prophylactic antibiotics are not required
REMOVAL
Indications
- Catheter no longer required
- Catheter no longer patent
- Suspected infection
- Complications (e.g. NEC, vascular compromise to the lower limbs)
Equipment
- Sterile stitch cutter
- Sterile blade
- Umbilical tape
- Cleaning solution - as per unit protocol
Procedure
- Wash hands and put on sterile gloves
- Clean cord stump with cleaning solution
- if umbilical tissue adherent to catheter, loosen by soaking cord stump with gauze swab soaked in sodium chloride 0.9%
- Ensure an umbilical tape is loosely secured around base of umbilicus
- Turn infusion pump off and clamp infusion line
- Take utmost care when cutting sutures not to cut through the arterial catheter
- Withdraw catheter slowly over 2–3 min, taking particular care with last 2–3 cm
- If bleeding noted, tighten umbilical tape
- Do not cover umbilicus with large absorbent pad, a small piece of cotton gauze should suffice
- Inspect catheter after removal: if any part missing, contact consultant immediately
Aftercare
- Nurse baby supine for 4 hr following removal, and observe for bleeding
Complications
- Bleeding
- Catheter tip inadvertently left in blood vessel